Loading...
play.nightshadecobbled.com
Click to copy IP
Have you ever wished you knew what you were doing? Yea, me too. Rarely happens but we all can hope I suppose. This wiki, in theory, will get us all one step closer to living our dreams and actually knowing how to play a game for once. Who knew Minecraft can be so difficult?
/chestshop allows you to see all your open chestshops as well as claim income from your sells
Ever had problems with not being able to share chests with friends because it's "locked"? It turns out that it's part of a really neat mod that gives you options when it comes to the privacy of your chests, aptly named HeyThatsMine. Below are some commands that'll help you out!
/htm set public Then left click on a chest to set as public. If you set a chest as public and it's not on a claim, people will be able to access it, so be careful!
/htm set private Then left click on a chest to set as private.
/htm set key While holding an item in your main hand that you would like to set as a key, left click on chest. That chest will then only open with that key. Be careful who you give keys to!
Trust will allow other players to open your chests if they are private and given the other player has container access on your claim.
/htm trust [player] Then left click on the chest to give trust for a player on that chest
If you need to give trust to one person for a lot of chests, toggle /htm persist first which will allow you to keep executing the same action without typing the command over and over.
/htm info Then left click on a chest to see who owns it, whether it's private or public, and who has trust on it.
/htm remove Will remove all protections on a chest
/htm transfer [player] Transfer ownership of a chest to another player.
And again, a player on your claim will need trust AND container access to access your private chests. You can set chests as public on your claim so container access is the only protection you have for your chests.
Welcome! We use the GriefDefender mod allow players to protect their builds and items from being raided and/or destroyed. This helpful guide explains the basic commands you'll need.
Claims: Protected rectangular areas of land. Only you (and those you trust) can build or interact within your claims.
Claim Blocks: You earn these by playing on the server. Creating and expanding claims uses up your claim blocks. You can check your balance by entering claim mode with /claim.
Claim Tool: The Golden Shovel. You use it to create and resize claims after initiating claim mode.
Trust: You can grant different levels of permissions to other players within your claims. These permissions can range from allowing players to just open doors to being fully co-owners of a claim alongside you. Most commonly, players granted trust will be given builder permissions unless otherwise specified.
This is how you protect your first area.
Initiate Claiming & Check Blocks: You can start the claiming process and check your available Claim Blocks using the /claim command OR by using the Claim Tool:
Mark Corners:
Allowing friends to build or interact in your claim.
Trust Levels (Most Common):
Granting Trust:
Example: /trust Jephon accessor (Lets Jephon sleep in this specific claim).
By default if you do not specify the trust level, players will be given builder level trust when trusting the player with /trust <Player Name>.
Once you have a claim, you might need to change it.
Resizing Claims:
Abandoning a Claim:
Abandoning ALL Your Claims:
Be very careful with this command.
Visualizing Claim Borders:
Hold a Stick and right-click the ground inside or near a claim. This will temporarily show the claim borders with particles.
Checking Claim Information:
Stand inside a claim and use /claiminfo.
Useful Commands:
/claim: Enters claim mode, shows your claim block balance, and prepares you to select claim corners.
/claiminfo: Stand inside a claim and use this command to see details like the owner, boundaries, and trust levels.
Whether a Pasture is activated is saved on the entity itself, so you'll only have to do this once. There is a limit of 3 Pastures that can be actively breeding at once.
We are using a combination of Crystal and Masuda multipliers so that if the egg's parents are shiny, the egg has an additional chance to be shiny and if both parents are from different trainers, the egg has an increased chance to be shiny.
/eggInfo will give you debug information about any eggs in your hand. The resulting species, and the ticks left til hatch.
Get ready, trainers! On our server, we've enhanced your Cobblemon adventure by adding a vibrant cast of new Pokémon. This brings more variety to competitive play and gives you exciting ways to find many stronger, fan-favorite Pokémon!
This guide details where to find them: many roam different biomes, while the rarest and most powerful await you in challenging Raids.
Below, you'll find comprehensive tables listing all the extra Pokémon that don't normally appear in Cobblemon but have been added to our server. These tables detail where to find each Pokémon and will also indicate if any special items are required for them to spawn or evolve.
The "Spawn Biome(s)" column uses simplified names for biomes. For a full list and detailed explanations of all Cobblemon biome categories, you can refer to the official Cobblemon biome guide: Cobblemon Biome Guide.
| # | Pokémon Name | Type(s) | Spawn Biome(s) | Rarity | Special Requirements |
|---|---|---|---|---|---|
| 27 | Sandshrew (Alolan Form) | Ice/Steel | Peak | Uncommon | None |
| 28 | Sandslash (Alolan Form) | Ice/Steel | - | - | Evolves from Alolan Sandshrew with an Ice Stone. |
| 58 | Growlithe (Hisuian Form) | Fire/Rock | Coast | Uncommon | None |
| 59 | Arcanine (Hisuian Form) | Fire/Rock | Coast | Uncommon | None |
| 88 | Grimer (Alolan Form) | Poison/Dark | Beach | Common | None |
| 89 | Muk (Alolan Form) | Poison/Dark | Beach | Uncommon | None |
| 109 | Koffing (Galarian Form) | Poison/Fairy | - | - | Breed Galarian Weezing. |
| 110 | Weezing (Galarian Form) | Poison/Fairy | Villages | Rare | Spawns during the day. Evolved from any Koffing when in mushroom biome. |
| 183 | Marill | Water/Fairy | River | Uncommon | None |
| 184 | Azumarill | Water/Fairy | River | Uncommon | None |
| 228 | Houndour | Dark/Fire | Nether, Plains during night | Common | None |
| 229 | Houndoom | Dark/Fire | Nether, Plains during night | Common | None |
| 298 | Azurill | Normal/Fairy | River | Uncommon | None |
| 300 | Skitty | Normal | Non-freezing Villages, Cherry Biomes | Common | More common at night, non-raining. |
| 301 | Delcatty | Normal | Non-freezing Villages, Cherry Biomes | Uncommon | More common at night, non-raining. |
| 307 | Meditite | Fighting/Psychic | Mountain | Common | None |
| 308 | Medicham | Fighting/Psychic | Mountain | Common | None |
| 309 | Electrike | Electric | Plains | Common | None |
| 310 | Manectric | Electric | Plains | Uncommon | |
| 325 | Spoink | Psychic | Plains, Crimson Forest, Warped Forest | Common | None |
| 326 | Grumpig | Psychic | Plains, Crimson Forest, Warped Forest | Common | None |
| 328 | Drilbur | Ground | Underground below y level 0 | Common | None |
| 333 | Swablu | Normal/Flying | Overworld | Common | Min. Y-level 150 |
| 334 | Altaria | Dragon/Flying | Overworld | Uncommon | Min. Y-level 150 |
| 353 | Shuppet | Ghost | Spooky | Common | None |
| 354 | Banette | Ghost | Spooky | Uncommon | None |
| 361 | Snorunt | Ice | Freezing | Common | None |
| 362 | Glalie | Ice | Freezing | Uncommon | None |
| 431 | Glameow | Normal | Villages | Common | More common at night. |
| 432 | Purugly | Normal | Villages | Uncommon | More common at night. |
| 434 | Stunky | Poison/Dark | Swamps | Common | More common at night. |
| 435 | Skuntank | Poison/Dark | Swamps | Uncommon | More common at night. |
| 453 | Croagunk | Poison/Fighting | Swamp | Uncommon | None |
| 454 | Toxicroak | Poison/Fighting | Swamp | Uncommon | None |
| 459 | Snover | Grass/Ice | Snowy Forest | Common | None |
| 460 | Abomasnow | Grass/Ice | Snowy Forest | Uncommon | None |
| 478 | Froslass | Ice/Ghost | Freezing | Uncommon | None |
| 517 | Munna | Psychic | Overworld | Uncommon | Spawns near white beds. |
| 518 | Musharna | Psychic | Overworld | Uncommon | Spawns near white beds. |
| 530 | Excadrill | Ground/Steel | Underground below y level 0 | Common | None |
| 531 | Audino | Normal | Plains, Highland, Forest | Rare | None |
| 535 | Tympole | Water | Water, Swamps | Common | None |
| 536 | Palpitoad | Water/Ground | Water, Swamps | Uncommon | None |
| 537 | Seismitoad | Water/Ground | Water, Swamps | Very Rare | None |
| 554 | Darumaka (Galarian Form) | Ice | Glacial | Uncommon | None |
| 555 | Darmanitan (Galarian Standard Form) | Ice/Fire | Glacial | Uncommon | None |
| 572 | Minccino | Normal | Birch Forest | Rare | None |
| 577 | Solosis | Psychic | Magical | Uncommon | None |
| 578 | Duosion | Psychic | Magical | Uncommon | None |
| 579 | Reuniclus | Psychic | - | - | Evolve Duosion at level 41. |
| 602 | Tynamo | Electric | Lush Caves | Uncommon | None |
| 603 | Eelektrik | Electric | - | - | Evolve Tynamo at lvl 39 |
| 604 | Eelektross | Electric | - | - | Evolve Eelektrik with a Thunder Stone |
| 610 | Axew | Dragon | Mountain, Taiga | Rare | Also found in Deep Dark, Mountain (Ultra-Rare). |
| 611 | Fraxure | Dragon | Mountain, Taiga | Rare | Also found in Deep Dark, Mountain (Ultra-Rare). |
| 612 | Haxorus | Dragon | Mountain, Taiga | Rare | Also found in Deep Dark, Mountain (Ultra-Rare). |
| 624 | Pawniard | Dark/Steel | Mountain | Common | None |
| 625 | Bisharp | Dark/Steel | Mountain | Rare | None |
| 667 | Litleo | Fire/Normal | Savanna, Badlands, Jungles | Common | None |
| 668 | Pyroar | Fire/Normal | Savanna, Badlands, Jungles | Uncommon | None |
| 672 | Skiddo | Grass | Hills | Common | None |
| 673 | Gogoat | Grass | Hills | Uncommon | None |
| 676 | Furfrou | Normal | Plains | Uncommon | None |
| 677 | Espurr | Psychic | The End | Uncommon | None |
| 678 | Meowstic | Psychic | The End | Rare | None |
| 694 | Helioptile | Electric/Normal | Desert, Savanna, Badlands | Uncommon | None |
| 695 | Heliolisk | Electric/Normal | Desert, Savanna, Badlands | Uncommon | None |
| 701 | Hawlucha | Fighting/Flying | Mountain | Rare | None |
| 702 | Dedenne | Electric/Fairy | Village, Arid | Uncommon | None |
| 713 | Avalugg (Hisuian form) | Ice/Rock | - | - | Bergmite evolves into Hisuian Avalugg when leveled up in a Peak or Frozen biome. |
| 714 | Noibat | Flying/Dragon | Spooky | Common | Spawns only during the night. |
| 715 | Noivern | Flying/Dragon | Spooky | Uncommon | Spawns only during the night. |
| 744 | Rockruff | Rock | Hills | Uncommon | None |
| 745 | Lycanroc | Rock | Hills | Uncommon | None |
| 777 | Togedemaru | Electric/Steel | Mountain, Highlands | Uncommon | More common near Lightning Rods. |
| 840 | Applin | Grass/Dragon | Forest | Rare | None |
| 864 | Galarian Corsola | Ghost | Ocean, Warm Ocean | Rare | None |
| 864 | Cursola | Ghost | Ocean, Warm Ocean | Rare | None |
| 876 | Indeedee | Psychic/Normal | Mansions, Hills | Rare | None |
| 877 | Morpeko | Electric/Dark | Spooky | Uncommon | None |
| 884 | Duraludon | Steel/Dragon | Overworld | Rare | Spawns near iron blocks. |
| 901 | Ursaluna (Bloodmoon Form) | Ground/Normal | Spooky | Ultra-rare | None |
| 921 | Pawmi | Electric | Arid | Uncommon | None |
| 922 | Pawmo | Electric/Fighting | Arid | Uncommon | None |
| 923 | Pawmot | Electric/Fighting | Arid | Uncommon | None |
| 937 | Tadbulb | Electric | Mangrove Swamp | Common | None |
| 938 | Bellibolt | Electric | Mangrove Swamp | Uncommon | None |
| 948 | Toedscool | Ground/Poison | Swamp | Uncommon | None |
| 949 | Toedscruel | Ground/Poison | Swamp | Uncommon | None |
| 968 | Orthworm | Steel | Desert | Rare | None |
| 983 | Kingambit | Dark/Steel | - | - | Evolves from Bisharp after defeating 3 Bisharp in battle. |
| 1010 | Dipplin | Grass/Dragon | - | - | Evolves from Applin by holding a Honey Bottle |
| 1011 | Hydrapple | Grass/Dragon | - | - | Evolves from Dipplin by giving it a Dragonbreath to hold |
| 1012 | Poltchageist | Grass/Ghost | Spooky | Rare | None |
| 1013 | Sinistcha | Grass/Ghost | - | - | Evolves from Poltchageist by holding a Cracked Pot |
| 1018 | Archaludon | Steel/Dragon | - | - | Evolves from Duraludon using a Metal Coat |
| # | Pokémon Name | Type(s) | Special Requirements |
|---|---|---|---|
| 144 | Articuno | Ice/Flying | Found in Raids |
| 145 | Zapdos | Electric/Flying | Found in Raids |
| 146 | Moltres | Fire/Flying | Found in Raids |
| 150 | Mewtwo | Psychic | Found in Raids |
| 151 | Mew | Psychic | Found in Raids |
| 243 | Raikou | Electric | Found in Raids |
| 244 | Entei | Fire | Found in Raids |
| 245 | Suicune | Water | Found in Raids |
| 251 | Celebi | Psychic/Grass | Found in Raids |
| 638 | Cobalion | Steel/Fighting | Found in Raids |
| 639 | Terrakion | Rock/Fighting | Found in Raids |
| 716 | Xerneas | Fairy | Found in Raids |
| 717 | Yveltal | Dark/Flying | Found in Raids |
| 720 | Hoopa | Psychic/Ghost | Found in Raids |
| 1009 | Walking Wake | Water/Dragon | Found in Raids |
| 1010 | Iron Leaves | Grass/Psychig | Found in Raids |
| 1023 | Iron Crown | Steel/Psychic | Found in Raids |
A huge thank you to the talented creators from the Cobblemon community for their amazing texture and model work, which we have permission to use on our server:
Disclaimer: Nightshade Cobbled is a strict non-p2w server and community. We do not offer anything for real money that gives a player a competitive or even a measurable advantage over any other player. While some servers and communities may sell crate keys on an online store for real money, we feel this violates our ethics and the non-p2w spirit we stand by. As such, the only way to get crate keys is by voting or from other crates. There will occasional opportunities to obtain them through in game events and drop parties - these possibilities are also available for any and all players.
Method to Obtain Gastly Keys: Voting /vote
Additional Methods (Rarely): Drop Parties (Or Other Events), NPC Dialog
Possible Loot / Weight:
Disclaimer: Nightshade Cobbled is a strict non-p2w server and community. We do not offer anything for real money that gives a player a competitive or even a measurable advantage over any other player. While some servers and communities may sell crate keys on an online store for real money, we feel this violates our ethics and the non-p2w spirit we stand by. As such, the only way to get crate keys is by voting or from other crates. There will occasional opportunities to obtain them through in game events and drop parties - these possibilities are also available for any and all players.
Method to Obtain Haunter Keys: Vote Parties (started when community collectively votes 35 times), Gastly Crates
Additional Methods (Rarely): Drop Parties (Or Other Events), NPC Dialog
Possible Loot / Weight:
Disclaimer: Nightshade Cobbled is a strict non-p2w server and community. We do not offer anything for real money that gives a player a competitive or even a measurable advantage over any other player. While some servers and communities may sell crate keys on an online store for real money, we feel this violates our ethics and the non-p2w spirit we stand by. As such, the only way to get crate keys is by voting or from other crates. There will occasional opportunities to obtain them through in game events and drop parties - these possibilities are also available for any and all players.
Method to Obtain Gengar Keys: Haunter Crates
Additional Methods (Rarely): Drop Parties (Or Other Events), NPC Dialog
Possible Loot / Weight:
Prepare for epic battles, trainers! Our server features an exciting Raid system, offering challenging mid- to endgame encounters against powerful Pokémon. Team up with your fellow players to defeat formidable Raid Bosses and earn incredible rewards, including a chance to catch these rare Pokémon for your team!
Raids are special boss battles that occur regularly on our server. Here's what you need to know to participate:
When a Raid is announced, act fast to join the fight:
/raid list to view available Raids and join.Working together is key to defeating a Raid Boss:
Can't wait for the next random Raid? You can initiate one yourself:
Successful Raids come with great rewards:
Good luck, trainers, and have fun conquering our server's Raids!
A huge thank you to the talented creators from the Cobblemon community for their amazing texture and model work, which we have permission to use on our server:
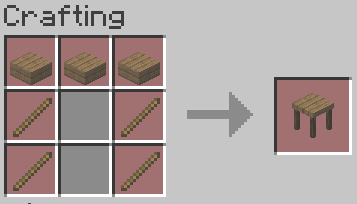
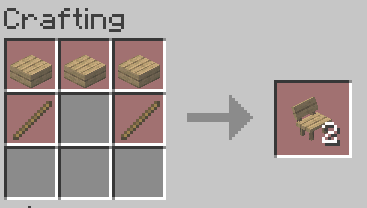
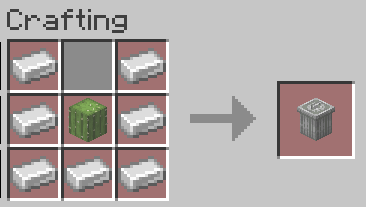
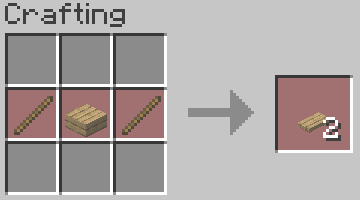
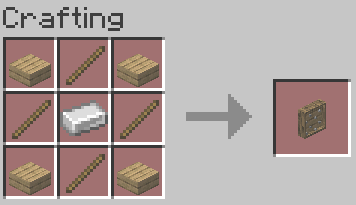
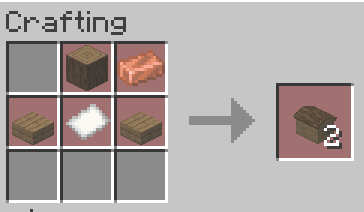
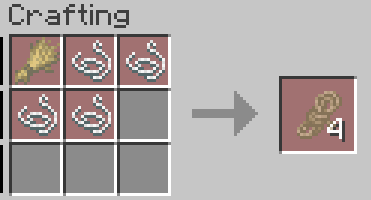
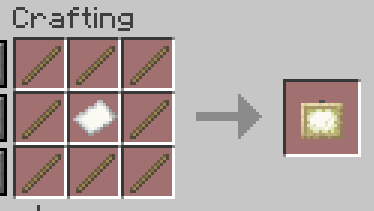
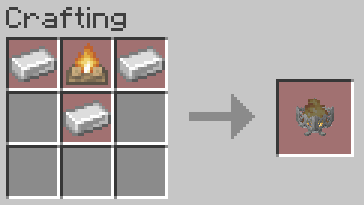
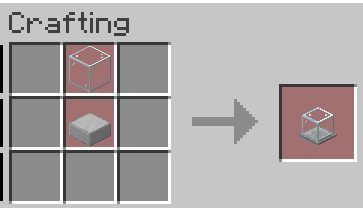
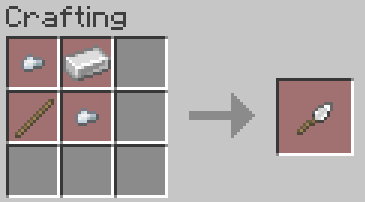
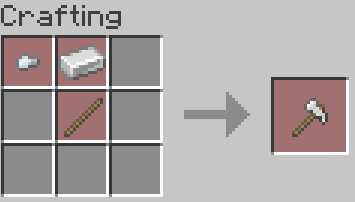
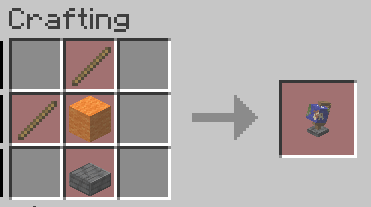
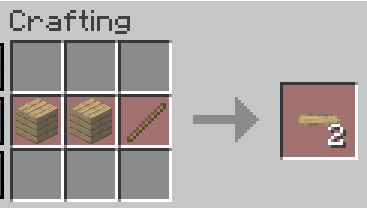
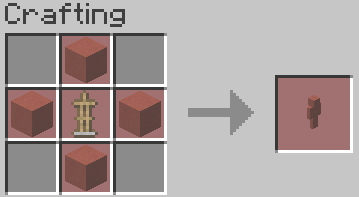
Discover exclusive crafting recipes on Nightshade! We've added new ways to create custom furniture and helpful tools, giving you more options to design the perfect home!
When a recipe calls for wood, you can use any basic wood type like Oak, Spruce, Birch, etc. Similarly, for Statues, any color of terracotta can be used.
Below, you'll find a visual guide to all our custom crafting recipes: